I Create My Own Static Site Generator
Instead of writing a blog post more often, I decided to redesign my four months old blog, ditched Jekyll and built a custom static site generator. The conversation went like this:
My inner Yoda: “Write more often this year, you must”
Dark side of the Force: “I find the combination of Ruby and Javascript is disturbing”
Me: “Okay, let’s reinvent the wheel and build the static site generator entirely in Javascript!”
I’m easily seduced by the dark side. It’s my bad habit. Rather than putting more thought into the writing, I procrastinate by rebuilding the blog from the start all over again. I promise myself that this is the last one 🤞. And as a compensation, I tried to make notes on new things I’ve discovered from building this static site generator.
You can check the code and the content of this website on my Github repository. It still needs some works to do: add some tests and extracting the generators to its own NPM module.
Table of Contents
The Tech Stacks
Previously I used Jekyll for generating this website. The thing is, it’s written in Ruby of which I’m not familiar with (it’s just procrastinator talking looking for justification 😛, actually Ruby code is delightfully expressive and readable).
Although there are some existing static site generators written in Javascript like Hexo or Gatsby, I procrastinate by building my own.
Luckily Javascript has a vibrant community. With its NPM ecosystem, there are tons of ready-to-use Javascript module. It’s like a building block of Lego. Where you can easily pick and plug modules to build your application.
Here are some packages that I use for building this website generator:
- markdown-it for parsing markdown file and convert it into HTML.
- highlight.js for syntax highlighting with theme based on Atom’s one dark.
- front-matter for extracting YAML front matter from the markdown file.
- pug for templating engine.
- webpack for bundling the assets.
- chokidar is used in development for watching for changes in markdown files or pug templates.
I also switch from DigitalOcean VPN to the fully managed Netlify service. They offer amazing features like high-availability CDN, automated Git deployment, one-click SSL and best of all: most of them are free!
Multiple Webpack Configurations
I need two separate output directories for the Webpack build. One is for the non-critical assets in public directory. And the other one is for the critical assets in template directory which later will be injected inline within the generated HTML file. However, in Webpack configuration object, we can only specify one output path.
Fortunately, Webpack allows us to export multiple configuration objects within the webpack.config.js file. This way we can have two separate build configurations and output paths. Here’s an example:
const path = require('path');

module.exports = [
  {
    entry: './src/assets/scss/critical.scss',
    output: {
      path: path.resolve(__dirname, 'src/layouts/includes'),
      filename: '[name].js'
    },
    module: {
        // ...
    }
  },
  {
    entry: './src/assets/scss/styles.scss',
    output: {
      path: path.resolve(__dirname, 'public/assets'),
      filename: '[name].[hash].js'
    },
    module: {
        // ...
    }
  }
];
Using chokidar as a Watcher
I use chokidar for development purpose. It will watch for file changes in blog posts directory (contains the markdown files) and the layouts directory (contains the pug templates). When a file is updated, added or removed, the generator will rebuild the static website. This way I don’t have to manually run the build command every time I make some changes.
There’s one small issue though. When the chokidar is started for the first time, it repeatedly emits the add event for each file found on the given paths. Causing the build command get executed for multiple times before the file scan is even completed.
To solve this issue, we can listen for the add event only when the chokidar is finished scanning the given paths. Chokidar will emit the ready event when the initial scan is completed.
const chokidar = require('chokidar');
const watcher = chokidar.watch('src');

watcher
  .on('ready', () => {
    // Listen to `add` event only when the initial scan is completed.
    watcher.on('add', filePath => {
      // Run build command
    });
  })
  .on('change', filePath => {
    // Run build command
   })
  .on('unlink', filePath => {
    // Run build command
  });
Combining ESLint and Prettier
I use both ESLint and Prettier together. ESLint for linting the Javascript files and Prettier for automatic code formatting. Besides checking for syntax errors and code quality, ESLint also has its own code formatting rules which can cause a conflict with Prettier.
To get around this problem we have to disable the conflicting rules in ESLint, let the Prettier do the code formatting. Simply install the eslint-config-prettier package through NPM:
$ npm install eslint-config-prettier --save-dev
Then update your ESLint configuration file to extend the configuration from the prettier.
// .eslintrc.js
module.exports = {
  extends: ['prettier']
};
One Command to Rule them All
It’s inconvenience to have two separate commands to lint and format the javascript files. Fortunately, we can configure the ESLint to run the Prettier for us. So when we run the eslint command, the prettier command will also get executed.
First, you need to install the eslint-plugin-prettier:
$ npm install eslint-plugin-prettier --save-dev
Then update your ESLint configuration file like this:
// .eslintrc
module.exports = {
  extends: ['prettier'],
  plugins: ['prettier'],
  rules: {
    'prettier/prettier': 'error'
  }
};
The plugins property is for registering an ESLint plugin. While the rules property is to configure individual ESLint rules, in our case we’ll treat any Prettier formatting issue as an error.
When you’re using the eslint-plugin-prettier, you no longer need to install the eslint-config-prettier package. Since we can get the same configuration from the plugin like so:
If you want to disable the conflicting ESLint rules and combine both the eslint and prettier commands, you can simplify your configuration by extending the plugin:prettier/recommended. You no longer needs to specify the plugins and rules properties like so:
// .eslintrc
module.exports = {
  extends: ['plugin:prettier/recommended']
};
Built-in promisify Function in Node.js
I love using Promise. Compared to the callback style, it’s a lot easier to read and dealt with. I usually use this simple function to convert an asynchronous callback style Javascript function into a function that returns a promise:
const fs = require('fs');

const promisify = fn => (...args) => new Promise((resolve, reject) =>
  fn(...args, (err, result) => (err ? reject(err) : resolve(result)))
);

// Promisify the native fs.readFile function.
const readFile = promisify(fs.readFile);

// The readFile() will return a promise object.
readFile('death-star-plans.md', { encoding: 'utf8' })
  .then(data => console.log(data))
  .catch(err => console.error(err));
Well, it turns out since v8.0.0, Node.js already have a built-in promisify function:
const fs = require('fs');
const util = require('util');

// Use built-in promisify function.
const readFile = util.promisify(fs.readFile);
Immediately Activate The Service Workers
I use the Service Workers for the offline support. So when you’ve visited this blog and later you lost your internet connection, you’ll still be able to see an offline version of the homepage.
It’s tricky to update the service worker code. when the code is updated, it will trigger the install event. Even though it’s installed successfully, the updated service worker won’t be activated until the existing service worker is no longer controlling the clients.
To get around this, we can call the self.skipWaiting() method to activate the newly updated service worker immediately. It’s pretty common to call this method within the install event. Though it doesn’t really matter as long as it’s called before or during the waiting period.
self.addEventListener('install', event => {
  // Installation steps

  self.skipWaiting();
});
Once it’s activated, the service worker will start taking control on the next page load. If you want to make the service worker takes control immediately, you can call the self.clients.claim() method within the activate event:
self.addEventListener('activate', event => {
  self.clients.claim();
});
Closing Thought
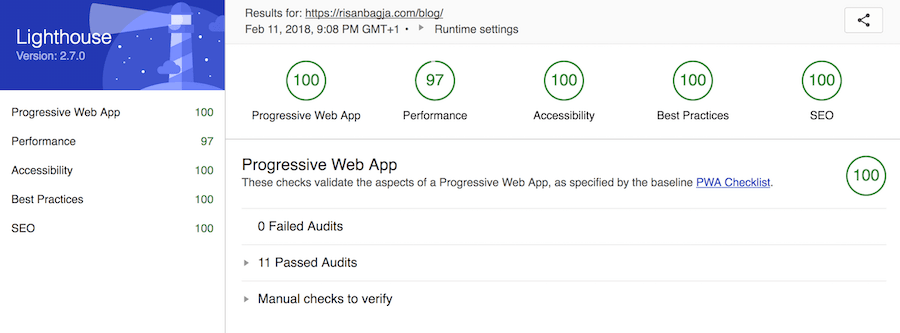
I’m really happy with my current blog setup. The look and feel are still simple. The performance is also better. It easily scored 100 on almost every Lighthouse matrix categories.
Hopefully, I don’t easily seduce by the Dark Side again and put my effort on the writing part instead 🤞. There are also two more things that I haven’t covered here:
-
Creating Webpack plugin for removing Javascript build files. Even though your entry point is just an SCSS or a plain CSS file, Webpack will still emit a Javascript build file. I’ve created a plugin for removing this unwanted JS file.
-
Creating a markdown-it plugin to generate an image tag that suits the lazysizes package. This lazysizes package is responsible for lazy loading images.
I’ll write these two topics later on separate blog posts.
Credits:
- Colorful Clown by Levi Saunders on Unsplash